Please be patient, this is the first pattern I have ever written and the instructions might be not as clear as they could be... E-mail me for suggestions or questions at antonia.franke@web.de


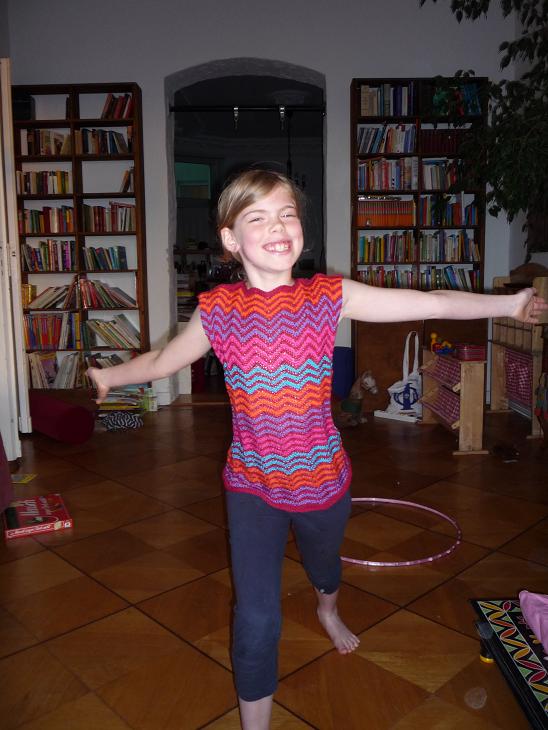
Zaggy Tee
General notes:
This T-Shirt is knit from the top down, mainly in rounds, so you (or the intended recipient) can try it on at any time. It is based on a very simple jaywalker pattern and shaped “invisibly” by decreasing or increasing the basic jaywalker multiple-of-sts .
I knitted it with bigger needles than the yarn calls for, because the k3tog and double KFBs result in a rather tight fabric.
The finishing is reduced to a minimum: Only at the armholes you pick up and knit three rows of garter stitch.
Abbreviations:
MC : Main Color
CC: Contrast Color
KFB: Knit into front and back of stitch (one stitch increased)
K2tog: knit two stitches together through front loops (one stitch decreased)
K3tog-tbl: knit three stitches together through
back loops (two stitches decreased)
SKP: Slip one, knit one, pass slipped stitch over (one stitch decreased)
SK2P: slip one, k2tog, pass slipped stitch over (two stitches decreased)
(→ Skip further notes and jump to instructions )
Notes on sizing:
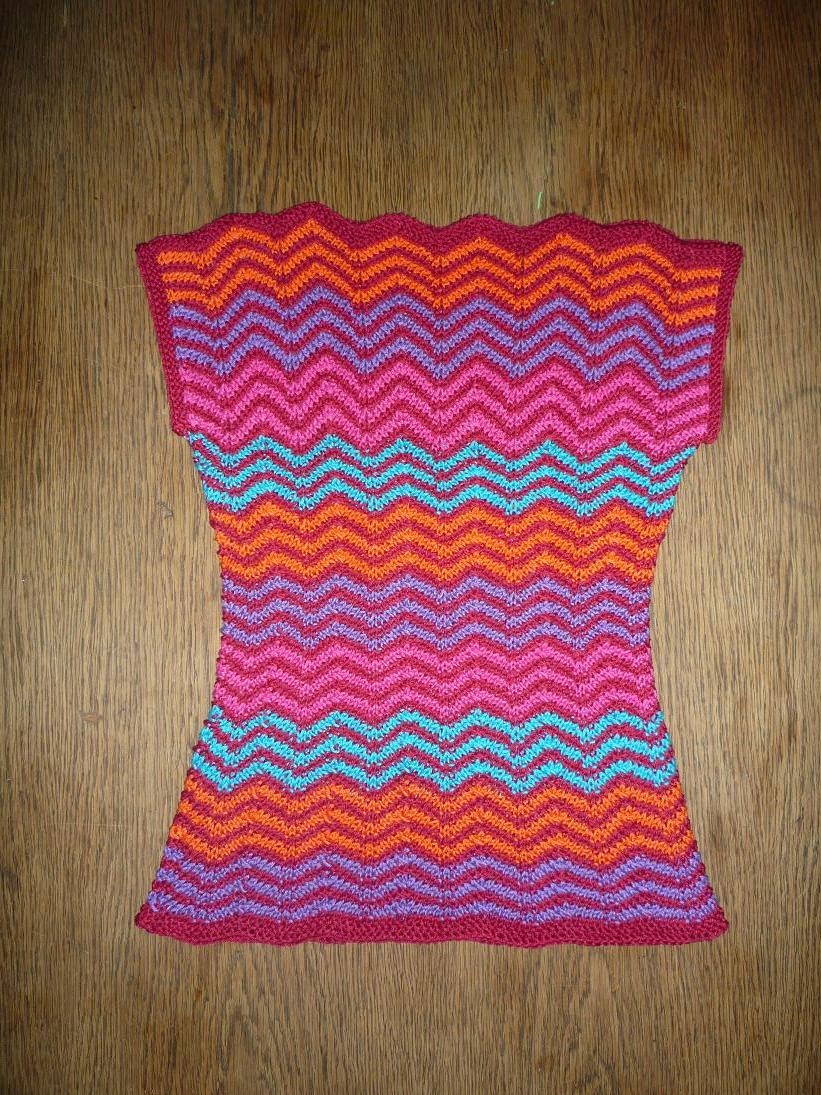
- Instructions are given for a childs size 146 (that is 146 cm or XXS). Chest size of this T-shirt is 35 cm (unstretched), length is 49 cm, narrowest part in the waist is 31cm. (I used my daughters favorite slim T-shirt as a guide for chest- and armhole-width and it worked fine.)
- Front and back are identical. (I have yet no idea how to make some goodlooking bust-darts with this pattern...)
- The T-Shirt is constructed by 7 jaywalker pattern repeats in the front + 7 repeats in the back (= 14 pattern repeats altogether). For shaping, this basic jaywalker pattern multiple is varied from 13 sts (shoulder), 11 sts (chest) to 9 sts (waist-sides).
- To make a larger or smaller version you can easily add or omit one or more of the pattern repeats (i.e. use 5 orfor example you could work 9 pattern repeats in front and back, each). Make sure to base your calculations on the chest (right under the arms) and your gauge swatch in pattern C. (Do not worry about the shoulder width, it is not critical).
(→ Skip further notes and jump to instructions )
Notes on colors
- Working three stripes with each CC makes the total color mix less turbulent and you have to weave in only a few yarn ends. For very small children I would work only two stripes in each CC.
- I recommend adding one exotic color (e.g. turqoise in a variety of reds). Try and knit some swatches with colors you’d never mix: you will be surprised :-)
- I like the sequence of * bright CC / dark CC / bright CC / dark CC * but other sequences maybe as nice.
(→ Skip further notes and jump to instructions )
Notes on yarn
I love Catania because it is so affordable, comes in beautiful colors, can be washed in a regular(!) washing program and doesn’t loose color, brightness or shape. It only becomes softer with every washing. The stitches are nicely defined and somehow “crisp” and the garment is shiny with a beautiful drape. This yarn is really perfect for childrens garments.
Credits
The design of this T-shirt is my very own, but I was inspired by these lovely
"Veränderte Jaywalker Socken" and two tops in
Filati Handstrick 37 (Models 6 + 13).
(→ Jump back to notes)
This is the first pattern instruction I wrote so I would be very glad about suggestions on how to make this instructions easier to understand! Please e-mail me at antonia.franke@web.de
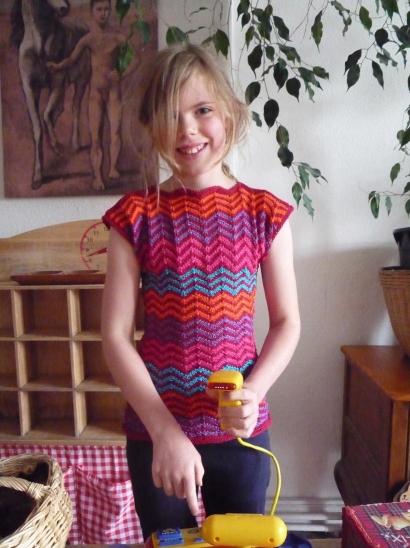
Instructions for the T-Shirt as shown in the pictures
(Childrens size 146, ~ 8/9 years)
Yarn
Schachenmayr Catania, 100 % Cotton.
MC: 2 skeins in dark red (I used it up to the very last inch…)
CCs: Orange, Pink, Lilac, Turqoise: 1/2 skein each
Needles
Circular needle in 4 mm, 60 cm length
Circular needle in 2.5 mm, any length
Gauge
11 stitches in Pattern C (= 1 multiple) = 5 cm
18 sts in stockinette stitch = 10 cm
General
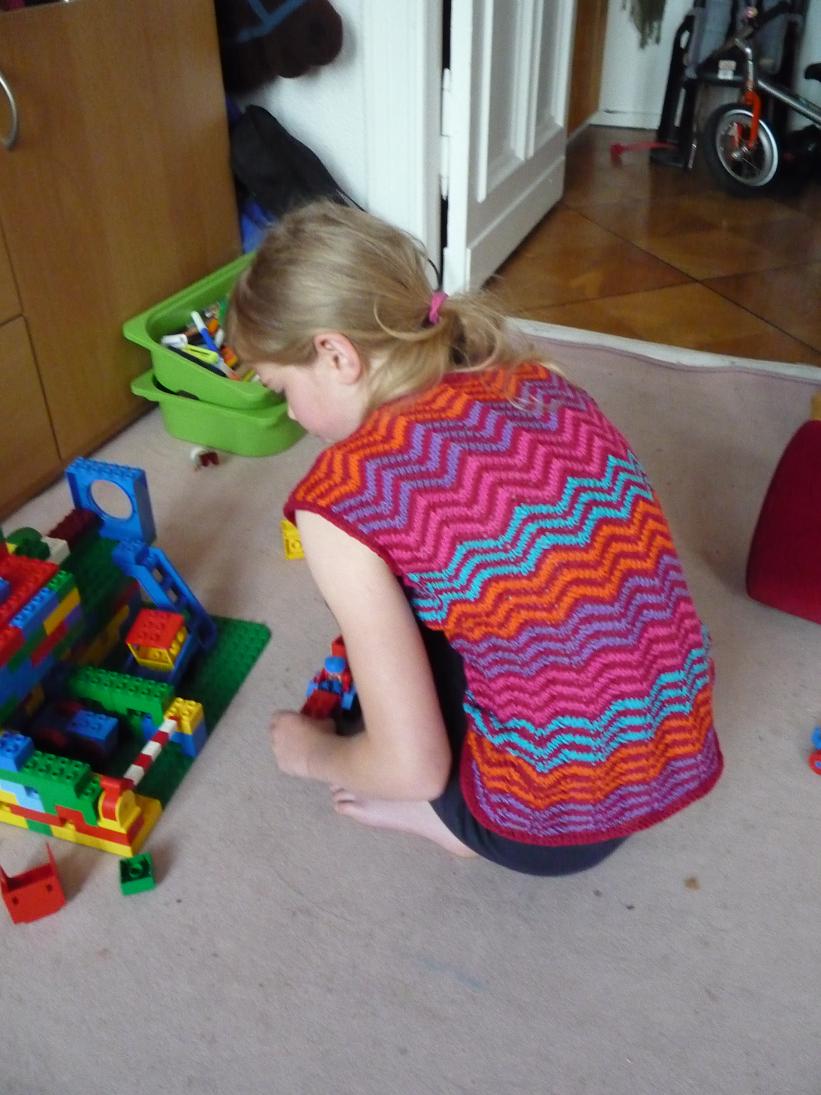
Upper back and front are worked in rows from the neckline/shoulderline down until work is long enough for the armholes. From that point, you will join back and front and continue in rounds.
There is no shaping for the neckline, the zigzag border makes it stretchy enough to get the head through comfortably.
Each, back and front, is made of 7 jaywalker repeats. Shaping width is done by changing the pattern multiple of sts.
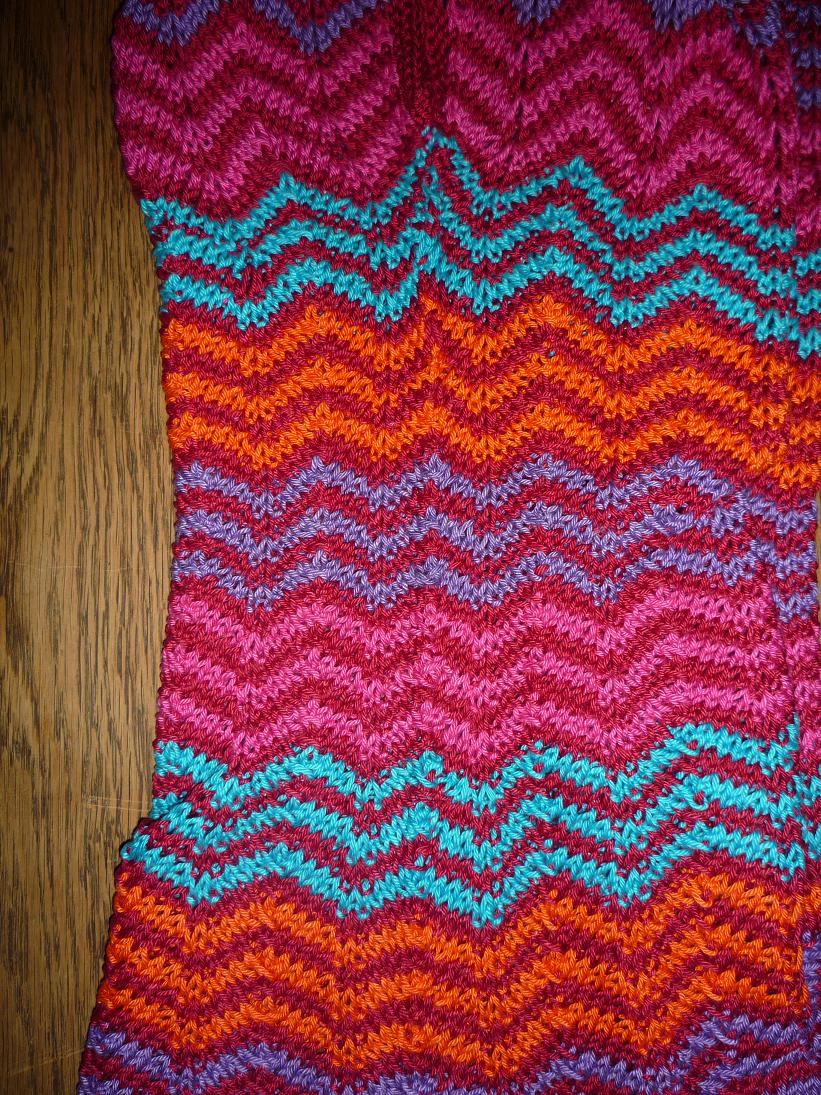
The color pattern is made of alternating stripes of MC and CC, changing CC after ever third stripe. Break each CC after completing the third stripe, leaving an 15 cm tail to weave in for finishing.
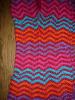
This is the beginning :-)
Back
Edge:
Using MC and
smaller needles cast on 94 sts. Work three rows in garter stitch.
Change to
bigger needles and start the jaywalker with a multiple-of-13-sts (see instructions below and chart of pattern A). You will work one modified side pattern repeat at each armhole-edge and 5 "normal" pattern repeats in the center of the back. All even rows are purled.
Instructions for back:
Row 1: With MC work k1, k2tog, k4, kfb, [*kfb, k4, k3tog, k4, kfb *] 5 times, kfb, k4, skp, k1 (see Pattern A). To avoid confusion - remember that kfb counts as 2 sts).
Row 2: Purl across
Row 3+4: With CC work as for row 1+2
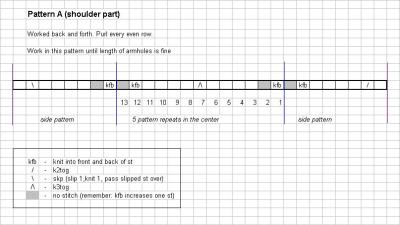
Larger version of chart (popup):
Repeat these 4 rounds until work is long enough for the armholes. In my model, this shoulder part ist 14-15 cm long and it ends just after the third stripe in pink. Break MC and CC and put stitches on holder or waste yarn.
Front
Work exactly as back.
Body
You will now join front and back to continue work in rounds. I strongly recommend to use a marker for the beginning of the round!
Overview:
- Firstly, sew front and back shoulders together
- Then eliminate the edge stitches for a continuous pattern.
- After that, reduce the width to chest-width by shortening the jaywalker multiple-of-sts from 13 to 11 sts (see pattern B and A).
- At the beginning of each round, use a “jogless jog” for color stripes.
Details:
1. Sewing shoulders:
Secure stitches (e.g. with waste yarn) and sew front and back shoulder seams together (as shown as the blue marked parts in the diagram below). The opening for the head is 3 pattern repeats wide (red marked part in diagram below), starting and ending with a peak (watched in the way Tee will be worn).
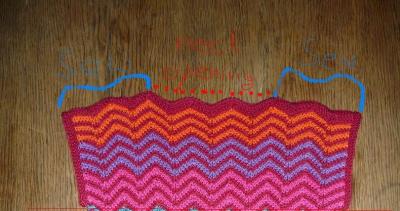
Larger version of Diagram (popup):
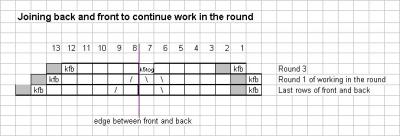
2.Joining to work in the round
- Refer to diagram below for clarity.
- (Remember to change color if desired ...)
Round 1: Work as before in pattern A until last st of front (the edge st) and work this st together with first (edge) st of back. Continue in Pattern A until last (edge) st of back, work this st together with first (edge) st of front. (186 sts)
Round 2: Knit
Round 3: (Change color!) Continue in Pattern A with the k2tog (=omit first edge st of chart) until just before the usual skp on front. Instead of that skp, work a k5tog. Continue in central pattern again until just before the usual skp on back and work k5tog instead (182 sts)
Round 4: knit across
Larger version of Diagram (popup):
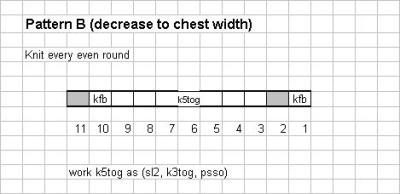
 3. Reducing width for chest
(Remember to change color if desired...)
- Round 1: k4, kfb, continue in pattern B (decrease pattern, see chart below) all across front and back for 13 repeats, than work kfb, k3, sk2p. (154 sts)
Larger version of Diagram (popup):
 4. “Jogless jog” for color stripes
- prepare jogless jog: k1, but in one round below, that is: work through both loops - MC and CC. Place marker.
- next round (round 2 in working color): Knit accross to marker. To complete this round, the marker has to be moved one st further. You can do it in either of two ways:
- Remove marker, k1, place marker again
- As for cabling without cable: knit into st after marker, leaving marker on left needle, than insert needle into marker and move both, st and marker on right hand needle (I will add a picture soon).
Round 2 with jogless jog is now complete. For each color stripe, the first st of round 1 is also the last st of round 2, The jogless-jog-st is therefore worked three rounds in the this color, but looks as only worked for 2 rounds.
Continue in pattern C (chest pattern) until you want to decrease for waist-shaping, using the jogless-jog between rounds 1 and 2 with moving the marker one st further each time. I strongly recommend this marker: without it you will probably forget to start increase/decrease and to change color at the beginning of round 1, once the joining of front and back is far down and out of sight.
My nearly perfect jogless jog can be seen in this picture :-)
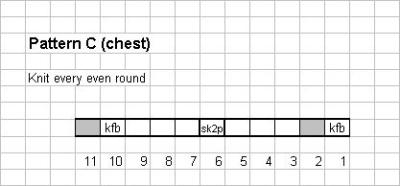
Larger version of chart (popup):
Decrease for waist:
I started the decrease for the waist after the complete three-stripe-sequence of turqoise, approx. 4 cm after the first MC round in Patterm C. I recommend to try on the T-Shirt before you want to decrease.
(
Clearer instructions in preparation...
Waist decrease no 1
Round 1: (At the side seams work k5tog instead of k3tog and k4tog instead of k3tog at the adjacing pattern repeats (8 st decreased)
Round 2: knit across
Following rounds: Work one multiple-of-9-repeat at each side of front and back and five multiple-of-11-repeat at the center of front and back (see diagram).
Waist decrease no 2 (If desired)
work as decrease no 1 for the second-to-side-seam pattern repeats
Waist increase no 1
Round 1: with a (m1,kfb,kfb,m1) instead of (kfb,kfb) return to multiple-of-11-repeat for the second-to-side-seam pattern
Round 2: knit across
Waist increase no 1
round 1: with a (m1,kfb,kfb,m1) instead of (kfb,kfb) return to multiple-of-11-repeat for the side-seam pattern
Round 2: knit across )
Continue until T-Shirt has desired length.
Work 3 rounds of garter stitch in MC. Bind off loosely (knitwise).
Pick up and knit sts from armholes, 3 sts for every 4 rows. Work 3 rounds of garter stitch in MC around armhole. Bind off loosely (knitwise) and admire your work :-).
(Even more notes on sizing and shaping...:
- If you dislike finishing, you could avoid it by knitting a 3-stitch selvage at the arms right from the beginning.
-
I havent tried, but I guess that an even number of pattern-repeats will result in a neckline less pretty than that of an odd number repeat. With odd numbers, the middle of the neckline will be a zigzag-dip, as shown in the fotos, but with even numbers you’ll get a zigzag-peak in the middle of the neckline. To avoid this when adjusting size, instead of adding or omitting pattern repeats you could use more or less stitches in the basic jaywalker pattern. In my instructions, the shoulder jaywalker-pattern has 13 sts and the chest jaywalker-pattern has 11 sts. I guess that the combinations of 11sts/9sts or 15sts/13sts would do as well. It will result in wider or narrower shoulders only. Please be so kind to e-mail me your experience if you tried this.)
- You could also decrease the width from shoulder to chest before the armholes are complete. I guess, it would result in an even more slim+slender look. As my daughter is very, very slim, I didnt want to enhance her slimness too much, but I would definitely try for this effect whenever I will work a tee of this for my own (not so slim) body...
fannar - 15. Jun, 09:11